
Character Controller:
In this project I created a custom CharacterController, its actually called PlayerController but its a CharacterController. This CharacterController, which has since been cleaned up and improved in another project, uses a struct called ColliderInfo to store information about the characters collider. The characters collider is a capsual but newer versions use a derivable, abstract class. From ColliderInfo, the CharacterController is able to simulate the movement of the collider along a given movement vector using the MoveTo function. The collision detection works by using two Physics.CapsualCastAlls using the hitbox given by ColliderInfo, with the second cast using an identical hitbox with a slight offset. The slight offset increases the size of the collider, like scaling its size up on all axis. Now FOR THE MATH!
For each object hit by the raycast, first you check if the move vector is going into the normal of the surface hit which is done by performing a dot product of the two vectors. If the value is less than 0, the movement vector is going into the surface. From here, the movement vector must be adjusted such that, if the CapsualCasts were repeated, this collision would not be present.
To do this, first we calculate how much the characters collider, given by ColliderInfo, intersects with the surface. We also get the colliders radius + the offset we applied during the second CapsualCastAll, the ‘True Radius’. Newer versions request the point on the collider that was hit, and assume dist is 0. Before any changes are made to the movement vector, we make sure the collider is in fact intersecting by comparing the intersection amount with the ‘True Radius’ of the collider. Finally, the movement vector is changed by adding the normal of the surface multiplied by the intersection amount.

Afterwards, the new movement vector is cast again, creating a loop that will persist until no colliders are hit by the CapsualCastAlls.
This process is repeated until there is either no more obstructions or it has attempted to resolve the move vector 100 times without success. The latter being to avoid infinite loops for highly specific terrain or floating point error. After movement has occurred, the function checks if the character is on valid ground to update the OnGround boolean.
If you are worried about this being expensive, this will usually only take 1 - 3 loops for standard geometry. It should be noted that this CharacterController sadly does not create a collider by Unity’s standards, as such, you cannot raycast against the CharacterController, nor is it capable of dealing with objects moving into its collider. You can, of course, copy data from the ColliderInfo struct and convert it to a Unity Collider to allow raycasting. This is the method I use with the new system.
Level Generator:
The level generator works using a random number generator and conditional based probability. When it generates a new row of tiles, it starts off by rolling the dice to see if it should change the height of a given lane on the new row. But, if the previous tile was a ramp or we have specifically requested for no height change, the height of the tile is set to be the height of the previous tile in its lane. Finally we initialize but don’t instantiate the tile, with the given height but before we continue, we must check if the previous tile, in the lane, had an indoor section. If it does, we set this tile to have an indoor section of identical height. We also check if the indoor section should end, and if it should, we reduce the height of the tile to the indoor height.
The second job is to solve for the level such that, from being on any given tile, there is another tile the player can safely reach. We first check if the hight change in the lane is > 0. This means there is now a wall, otherwise we can ignore this lane. To solve this, we initialize an integer called “validLanes” to 0 and then check the tiles to the left and right. We check if they are equal height or lower. We check the new row and the previous row of tiles. If a lane passes the checks on both the new row and previous row, then we increase validLanes by 1. If the previous row has an escape route by going left or right and the lane to the left or right does not have a height increase, its safe.
After checking the left and right, if validLanes is still 0, this means that the player would be boxed in on all sides with no way out. The solution is to roll the dice. If the dice say, create an indoor section, we place a door, otherwise we convert the current tile into a ramp. Now the path is solved but we can still have some fun. If the change in height between the current tile and previous tile in the same lane is exactly 1, we can roll the dice, and if they say ramp, we replace the new tile with a ramp tile. We repeat this idea for doors. This ensures that ramps and doors can spawn even if its not a dead end.
Finally we put obstacles on the map. Obstacle spawning is timer based where each lane has its own timer. If the timer reaches 0, spawn an obstacle with some exceptions like, don’t spawn an obstacle immediately after a door. Don’t spawn an obstacle immediately after a ramp and so on.
Now with the data generated, we Instantiate each tile, giving them a physical presence in the game scene and apply decorations.
Model Swapping:
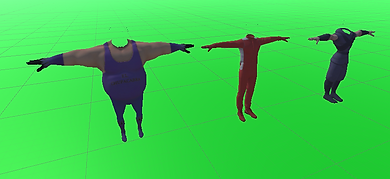
On the main menu screen, you can swap the players model. This could be easy except if you had important information on the skeleton such as colliders. Rather than creating an identical prefab and copying over data, I created a model swapper. This was to future proof development when I add capes so I don't have to create an identical cape on 4-5 different prefabs + future models. The primary problem I had to solve was bone rebinding and scaling. Each of the models have somewhat different distances and angles for their bones. If I do a simple model swap, you get this nightmarish creature of the depths.
So I made a SkinnedMeshBoneRebinder. Its as complicated as the name. The first job is easy, makes sure there are enough SkinnedMeshRenderers for the new model as different models use different numbers of renderers. Then copy over the mesh and material information and the model is now swapped.
Now for the bones.
The first job is to loop over ALL the bones on the player and play connect the dots with the bones on the new model for each SkinnedMeshRenderer that we rebound. This ensures that the new model is correctly bound to the new bones. Why is this necessary? Because some Mixamo models have a different suffix to their bones so the bones won't automatically link up.

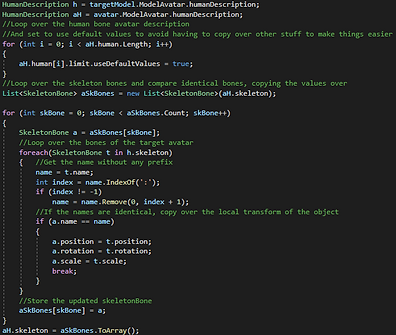
And now, the fun part. Avatars. Originally I planned to simply create a duplicate avatar with the rescaled limbs and replace the current avatar. This sadly isn't possible because SkeletonBones contain private data that references the name of its parent. I cannot access this data no matter how hard I try. The solution is to play another game of connect the dots. We loop over all of the bones of the players SkeletonBones and all of the new models SkeletonBones. If the names are identical, with the suffix removed, we copy over the position, rotation and scale of the SkeletonBone.
Finally, we store the updated skeleton bones back into the players current Avatars HumanDescription. Then copy that HumanDescription into the HumanDescription of the new models avatar before FINALLY generating a new avatar for the player and assigning it to the players animator.
And now the model is swapped. Easy... This is not efficient and in any, normal project with a team, you'd just ask the modeler/animator to use the same rig and same scale.

Cool Shaders:
Additionally, this project uses some cool shaders to improve the game. These were written in HLSL as the project is a Legacy project. I do have preference for HLSL as I find it much easier to follow then graphs.
By far one of the most important shaders is the 'PopUp' shader. This shader reduces the y position of vertices the further away from the camera the object is. This effect only kicks in once the vertices is a fixed position away from the camera. This allows the level to generate without creating that horrible pop-in effect in the distance. It also contains extra functionality to cull the sides of tiles which allows for the indoor sections to exist.
This works by culling parts of tiles that intersect a global AABB. This way, when there is a door that begins opening, the AABB is moved into the door to create a visible opening.
The second important shader is the 'Character' shader. This shader reads a second texture file to determine whether a given piece of the model should be culled. This allows me to specifically cull the face of a character model and, since this is a first person game, avoids the head getting in the way when performing actions.
The other two important shaders, the 'Obstacle' shader and 'SpeedLines' shader are very simple. The 'Obstacle' shader changes the colour of the object based on distance to make obstacles visible. The 'SpeedLines' shader renders the speed lines infront of environment but behind the player.