
Summary:
This project was made in a team over the course of 4 weeks. A total of 10 in class work days. The team was 4 strong. 1 designer and 3 programmers. The artists came in during the final week, 2 days as their discipline had other work to do. The 2 other programmers worked on the main game loop, the guns and enemy spawning systems. I worked on menus, tutorials, player & player feedback and bug fixing. I worked alongside our gun programmer to help fix bugs and build in player interaction. There are lots of systems I could talk about from this project but I'll cut it down to the cool stuff.
The Editor Tool:
This project was specifically designed for the Oculus GO, with all its limitations. The Oculus GO does not support positional tracking, only rotational tracking. Before the project began, I foresaw testing and debugging issues. We would only have access to 1 headset and the designer would have to keep bugging the programmers to build the project for them.
The solution to this was to create an OculusGO simulator. This tool simulated the head and pointer of the Oculus GO using a middle man input system, that used keyboard and mouse while in editor but would use the controller and headset inputs in builds. To simulate rotation of the head and aiming with the pointer, I copied an idea from an old Wii game, Conduit 2. The pointer aims towards where the mouse is hovering over on the screen. If the mouse gets close to the edge of the screen, the camera will rotate. The pointer is represented by a transform in the scene, making it easy for other code to work around the different devices.
Instead of our systems directly linking into the OVR library, we instead linked into my OGInputManager which dealt with swapping input reading methods between PC and Oculus GO. This saves us a lot of time as we could, quite effectively, test and debug in editor while only having to use the headset for checking scale, VFX & FPS.
The links into the OGInputManager were designed to be as similar to the old input system as possible, using an enum to specify which button to read the information of. To detect a press and release, an input stores its current and previous value. If previous is 0 and current greater than 0, we got a press. If current 0 and previous greater than 0, we got a release. This is updated in the Update loop.
There is:
- Get
- GetUp
- GetDown
- GetValue
- GetRaw
- GetTouchPad
- GetTouchPadRaw
Just about everything you could need. Safe to say, this system saved us a lot of development time.
Aiming Reticles:
During the project, I made the call to have a reticle system. Enemies nearby where you are aiming would be highlighted by a reticle. This system was later expanded upon when we implemented the lock on missiles to display a reticle over enemies that are locked onto.
This system was somewhat simple. There would be 2 reticle systems, one for each eye. A parent reticle system would tell these two reticle systems which enemies to display. This worked by raycasting from between the eyes to a target and telling the child reticle systems to either add or destroy any reticles related to this target. This is to ensure that both systems are displaying reticles for a target and we don't have a situation where 1 eye has a reticle and the other does not.
When raycasting to determine if a target should get a reticle or not, you raycast onto an invisible quad that floats in front of the player, covering the area that the reticle should display. For us, this Quad was parented to the pointer. If the raycast misses the quad, then don't display, otherwise, display. Displaying uses an identical method except the reticles are placed on the quad and rotated to look towards the origin of the raycast.
So that the child reticle systems never miss and thus delete their reticle, they have a massive quad in front of them to raycast and place reticles against. So they literally cannot miss and will never unload a reticle unless told to by the parent.
In an Update loop, each reticle system works to ensure that the reticle remains layered over the top of its target, relative to an origin transform. Finally, we used layers to ensure the reticles only displayed for its specific eye.
This results in a convincing UI overlay that feels just right.
SHADER POWER!:
In the project I made a few shaders. This includes the shaders for the radar & enemy shields and their wavy variants.
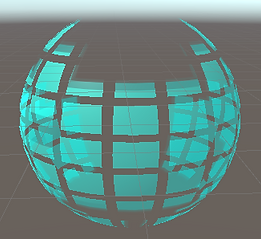
The radar & enemy shields shaders are opposites of each other, literally. Where radar would cull a pixel for transparency, enemy shields renders and vice versa. The radar shader works in 2 culling stages. The first stage culls if a given point on the object is not within specific vertical ranges, to create the horizontal stripes. This is done using a modulus (%) operator. We create a small range where if the y pos is greater, cull. We apply the modulus operator to the y position using the range to put any point into the range, effectively pulling that point to the bottom of the shape.
The second stage uses the formula A^(B * (distance + C)) + D. This value is then used to cull the shape... Its a formula and it works. Don't question it. The purpose of the formula is to take an angle along a horizontal plane and the distance from the closes point on the y axis to determine if a pixel should render. As the distance increases, the valid angle decreases to create the vertical stripes. Add a bit of transparency and make it unlit and BOOM. Cool shader.
The Waved variants interpolate between 2 colours based on the density of the waves and how fast they are. The result, with a bit of value tweaking is this! You can even get some interesting results on other shapes.
Don't tell anyone the alien from space invaders is our shield. ;)